
 İngilizce
 中文简体
中文简体 Русский
 Español
 Português
 Türkçe
 العربية
 Deutsch
 Polski
 Italiano
 Français
 한국어
한국어 ไทย
ไทย Tiếng Việt
 日本語
日本語





























UV Lamba Test Sistemi
Kullanım Kılavuzu
uygulanabilir LISUN modeller: LMS-9000CUV,LMS-9000CUV-VIS,LPCE-2(LMS-9000CUV)
1. Ekipman Hakkında Temel Bilgiler
1.1 Kutudan Çıkarma ve İnceleme
Cihazı ambalajından çıkarırken, dış kasayı keskin aletlerle çizmemek için nazikçe tutun. Ambalajdan çıkardıktan sonra, öncelikle cihazın dış yüzeyini inceleyerek görünür bir deformasyon veya ezik olup olmadığını ve düğmelerin hasarlı veya gevşek olup olmadığını kontrol edin. Cihazda veya aksesuarlarında herhangi bir anormallik fark ederseniz, cihazı açmayın. Lütfen hemen bizimle iletişime geçin.
1.2 Temel Donanım Bileşenleri
Şekil 1-1'ye bakın.
| Numara | not |
| ① | High-Precision UV Spectroradiometer, Model LMS-9000CUV |
| ② | Quartz UV Optical Fiber Cable, Model CFS-1.5M |
| ③ | USB kablosu |
| ④ | Dedicated Power Supply for UV Standard Light Sources, Model SLS-UV-P |
| ⑤ | Ultraviolet Standard Light Source, Model SLS-UV |
| ⑥ | Connecting rod, used for mounting a UV Standard Light Source |
| ⑦ | Power cord, used to connect the dedicated power supply for the UV Standard Light Source to the test dark box |
| ⑧ | Test Chamber, Model CASE-UV036 |
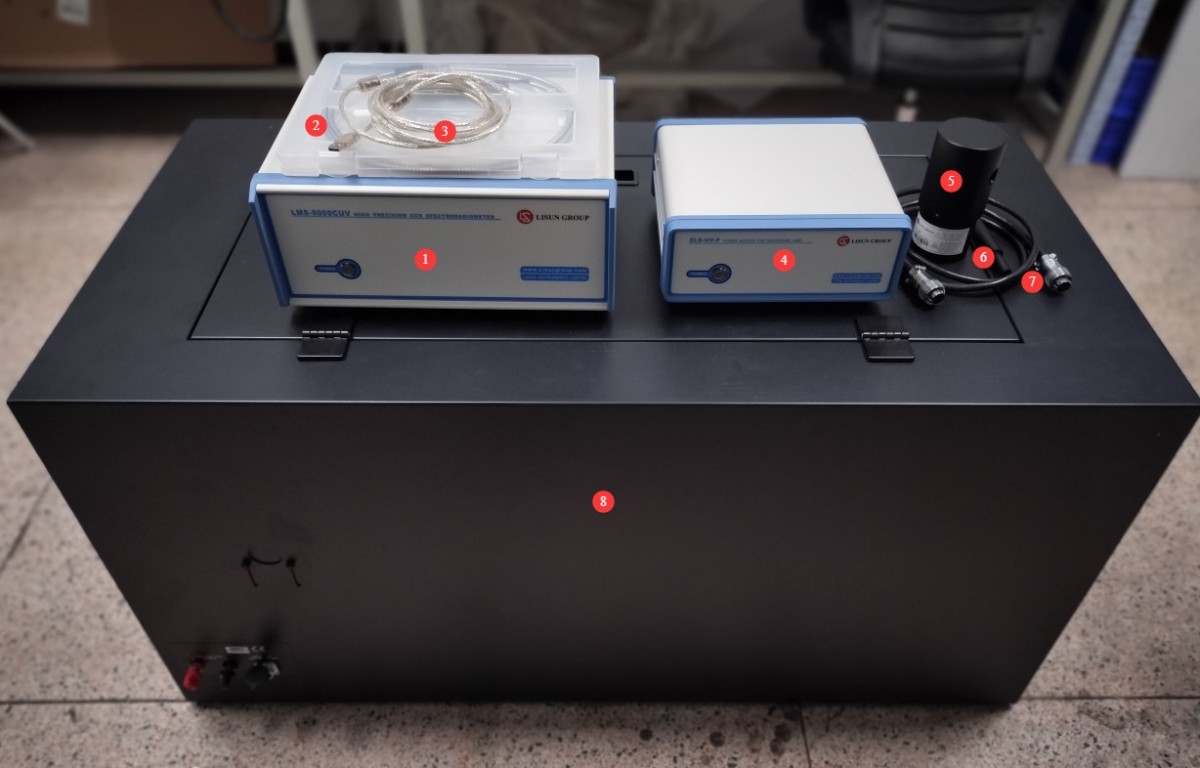
Şekil 1-1
1.3 Elektronik Belgelerin İndirilmesi
Ürün gönderimi sırasında elektronik kullanım kılavuzu, yazılım, garanti kartı ve diğer materyallerin indirme bağlantılarını e-posta yoluyla zaten gönderdik. Lütfen bunları en kısa sürede indirin. E-postayı kaçırdıysanız, indirme bağlantılarını tekrar istemek için lütfen bizimle iletişime geçin.
2. Kullanım Önlemleri
2.1 Çevresel Güvenlik
Ekipman, tozdan ve aşındırıcı gazlardan arındırılmış, kuru ve iyi havalandırılmış bir ortama yerleştirilmelidir;
Ortam sıcaklığı: 15–35°C; bağıl nem: ≤%65 (yoğuşma yok);
Cihazı güçlü manyetik alanlardan ve güçlü elektrik alanlarından uzak tutun.
2.2 Çalıştırma Prosedürleri
The natural service life of an ultraviolet standard lamp is 1 year; it is recommended that it be replaced when it reaches the end of its service life to avoid affecting test accuracy;
Optical Fiber must not be bent excessively (bending radius ≥ 10 cm). Do not step on or crush the Optical Fiber, as this may cause damage and result in abnormal test results.
2.3 Protection from Direct UV Rays
This equipment is used for testing ultraviolet light sources. Direct exposure to ultraviolet light can cause burns and irreversible damage to the eyes and skin. Under no circumstances should you look directly at the ultraviolet light source or allow ultraviolet light to shine directly on your body during operation.
2.4 Diğer
Bu kılavuzda yer almayan konular için lütfen dikkatli ilerleyin veya bizimle iletişime geçin.
3. Equipment Overview and Connections
MKS LMS-9000CUV is a Spectroradiometer used for testing; the CASE-UV036 is a test chamber used to provide the testing environment. This primarily concerns the connection between these two devices.
3.1 Introduction to and Wiring of the LMS-9000CUV
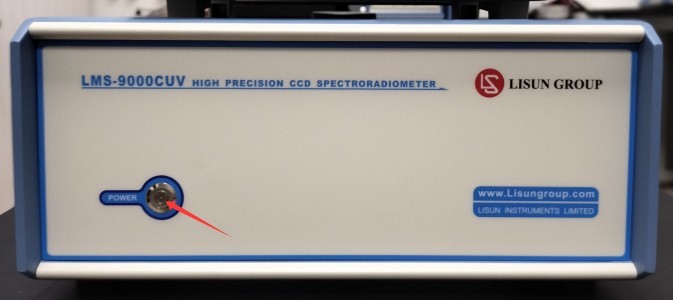
3.1.1 Ön Panele Giriş
See Figure 3-1. The front panel of the device includes the device’s power switch.
Şekil 3-1
3.1.2 Arka Panele Giriş
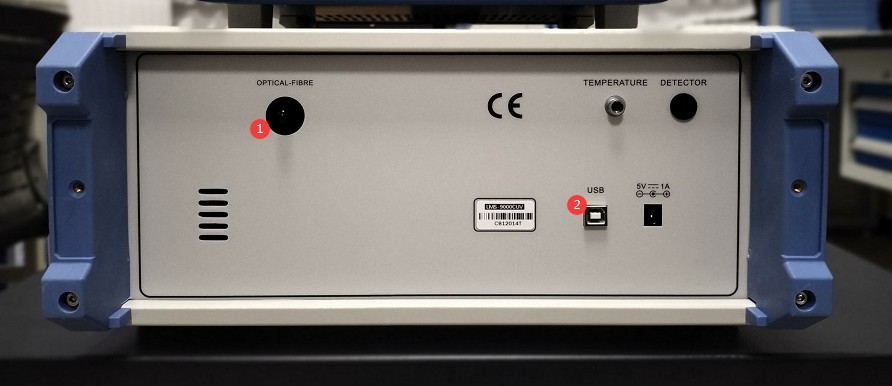
Şekil 3-2'ye bakın.
| Numara | not |
| ① | Optical Fiber interface; connect via Optical Fiber cable to the test anechoic chamber |
| ② | USB port: Connects to a computer via a USB cable to communicate with computer software and power the device. |
Şekil 3-2
Note: The other ports are for backup purposes only; there is no need to connect to them.
3.2 Introduction to the Test Chamber and Wiring
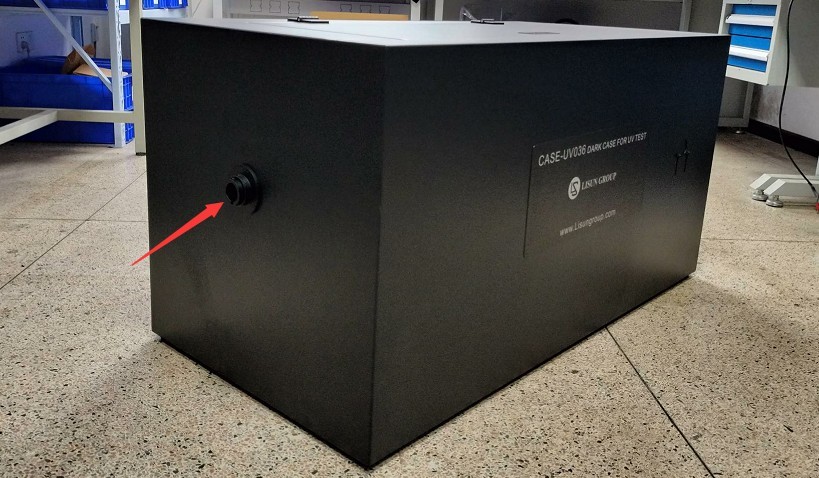
3.2.1 Optik Fiber Bağlantıları
Optical Fiber connection interface; see Figure 3-3.
Şekil 3-3
Once the Optical Fiber connection is complete, see Figure 3-4.
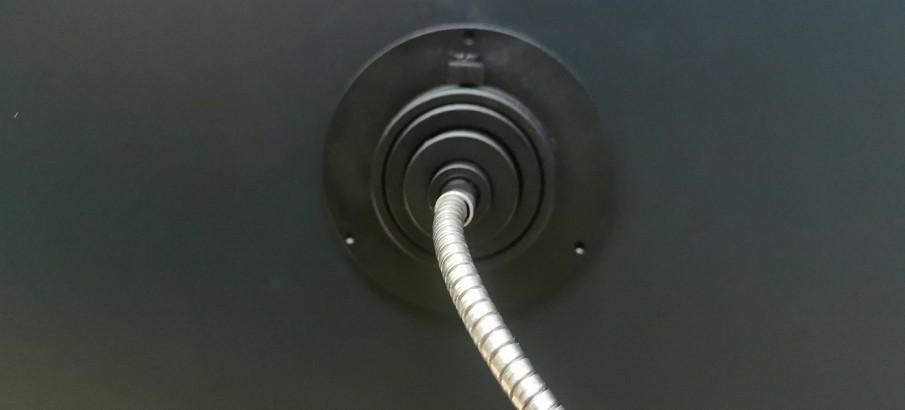
Şekil 3-4
3.2.2 Testing the Appearance of the Test Chamber and Other Interfaces
Şekil 3-5'e bakınız.
| Numara | not |
| ① | Light box cover; open to view the interior and install lighting fixtures |
| ② | Mounting holes for linear light fixtures |
| ③ | Terminals for the Sample Luminaire Power Cord |
| ④ | Standard Light Source Power Cord Connector |
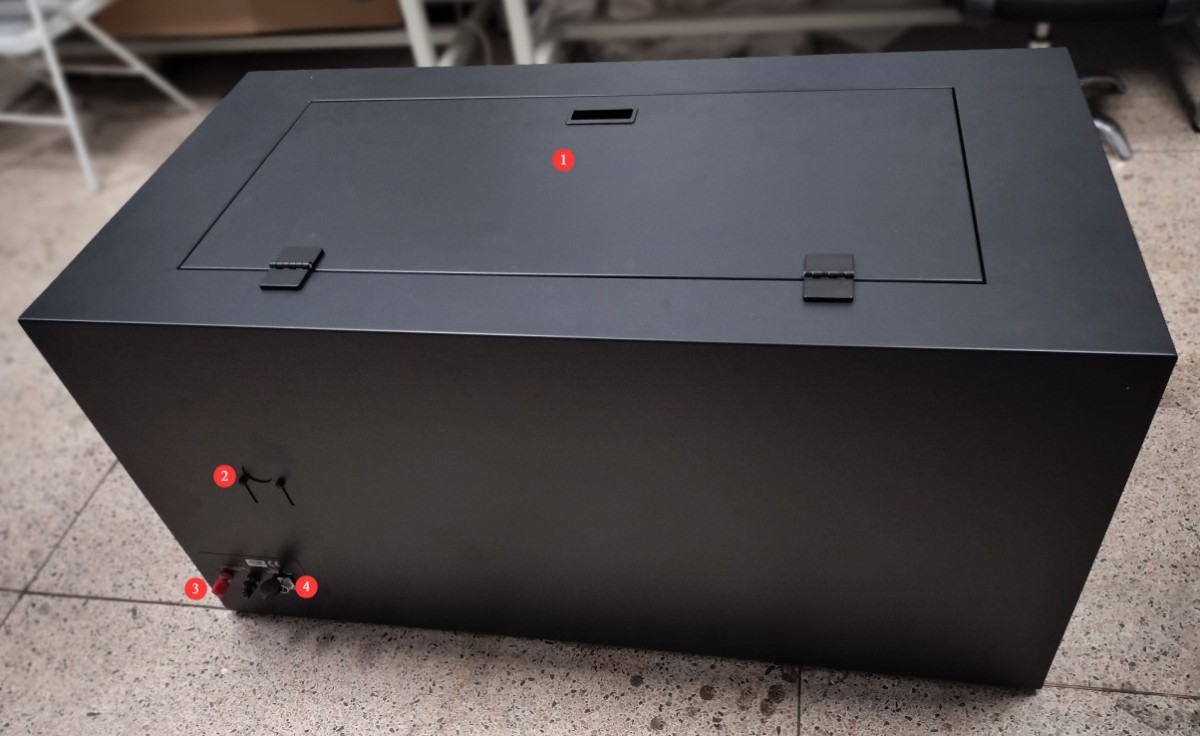
Şekil 3-5
4. Yazılım Kurulumu ve Genel Bakış
4.1 Yazılım ve Sürücü Kurulumu
4.1.1 Yazılım Çalışma Ortamı
Sistem Gereksinimleri: Windows 7/8/10/11 (32-bit/64-bit); bilgisayarda en az bir USB bağlantı noktası bulunmalıdır.
Note: If you have purchased multiple LMS-9000 series Spectroradiometers, please connect them to different computers whenever possible and avoid mixing them, as doing so may cause the software to display incorrect data.
4.1.2 Kurulumu
Şekil 4-1'ye bakın.
| Numara | not |
| ① | LMS-9000CUV software installation file—please double-click to install |
| ② | LMS-9000CUV Driver—Please double-click to install |
| ③ | SLS-UV Ultraviolet Lamp Calibration File (Note: Each Standard Light Source has a different file), which must be used during system calibration |
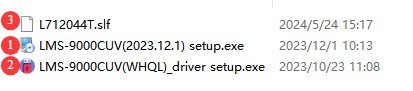
Şekil 4-1
4.1.3 İstisna Yönetimi
Yazılım yükleme işlemi sırasında virüs koruma yazılımınız veya Windows Güvenlik Duvarı bir dosyayı şüpheli olarak işaretlerse, lütfen virüs koruma yazılımını veya Windows Güvenlik Duvarını geçici olarak devre dışı bırakın ve ardından yazılımı tekrar yüklemeyi deneyin.
If the software fails to open when you double-click the icon after a successful installation, please check whether you are logged in to your computer with an administrator account. If the software still does not open after logging in with an administrator account, right-click the software icon to open its Properties window. On the Compatibility tab, check the box next to “Run this program as an administrator” and click “Apply” (Figure 4-2), then double-click the icon again to open the software.
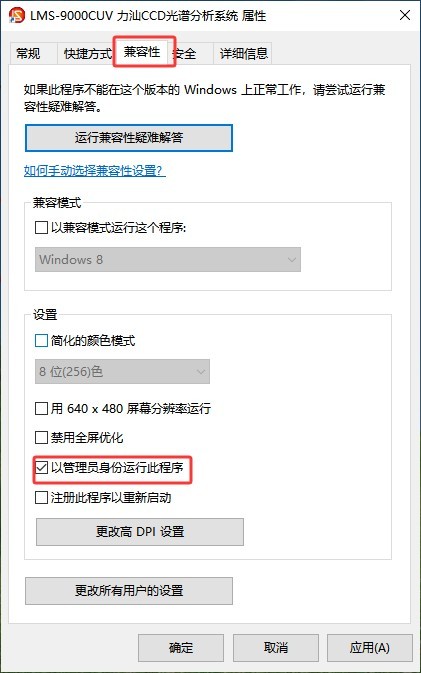
Şekil 4-2
4.2 Initial Software Setup
4.2.1 Yazılımın Açılması
The first time you open the software, you will be prompted to create a new database file (in .lmsuvi format); subsequent test reports will be automatically saved to this database file. Please enter a file name, select an appropriate path, and click “Save.”
Not 1: Bu LMS-9000CUV software can be installed on any computer, but it will not function unless that computer is connected to an LMS-9000 device.
Not 2: LMS-9000 yazılımı tarafından oluşturulan veritabanı dosyaları yalnızca LMS-9000 yazılımı kullanılarak açılabilir.
Not 3: Lütfen mümkün olduğunca veritabanı dosyalarını bilgisayarınızın masaüstüne yerleştirmekten kaçının, çünkü bu veri okuma veya yazma sırasında hatalara neden olabilir.
4.2.2 Sistem Yapılandırması
Şekil 4-3'ye bakın.
| Numara | not |
| ① | “Sistem Yapılandırması”na tıklayın. |
| ② | Spectroradiometer models and related information; the software can automatically retrieve this data |
| ③ | Maximum automatic integration time: During testing, the integration time is set to “Auto” and is inversely proportional to the intensity of the mercury lamp being tested. It is recommended to use a longer maximum automatic integration time—such as 10000—to facilitate testing under low-light conditions. |
| ④ | The wavelength test range is set from 200 to 450 nm. Please verify that the display is correct; if not, please adjust it. |
| ⑤ | Satın aldığınız AC güç kaynağının modelini (genellikle LSP Serisi) seçmek için açılır listeye tıklayın. Eğer bir AC güç kaynağı satın almadıysanız LISUN AC güç kaynağı için lütfen "Kurulu Değil" seçeneğini seçin; aksi takdirde iletişim hatası oluşacaktır. |
| ⑥ | Satın aldığınız DC güç kaynağının modelini (genellikle DC Serisi) seçmek için açılır listeye tıklayın. Eğer satın alma işlemi yapmadıysanız LISUN DC güç kaynağı için lütfen "Kurulu Değil" seçeneğini seçin; aksi takdirde iletişim hatası oluşacaktır. |
| ⑦ | Satın aldığınız güç ölçer modelini seçmek için açılır listeye tıklayın; model numarasını güç ölçerin ön panelinde bulabilirsiniz. Lütfen satın aldığınız doğru modeli seçin. Eğer bir model satın almadıysanız... LISUN Elektrik sayacı için lütfen "Kurulu Değil" seçeneğini seçin; aksi takdirde iletişim hatası oluşacaktır. |
| ⑧ | The standard test distance for the light box is 1 meter. If you change the actual test distance, please enter the correct test distance here; otherwise, the test data will be incorrect. |
| ⑨ | Please enter the correct area of the light-emitting surface of the sample luminaire. |
| ⑩ | Click to automatically search for the communication port. If an error message appears, please check the connection of the communication cable for the corresponding device according to the message. |
| ⑪ | Tüm ayarlar ve iletişim yapılandırıldıktan sonra, kaydetmek için Tamam'a tıklamanız yeterlidir. |
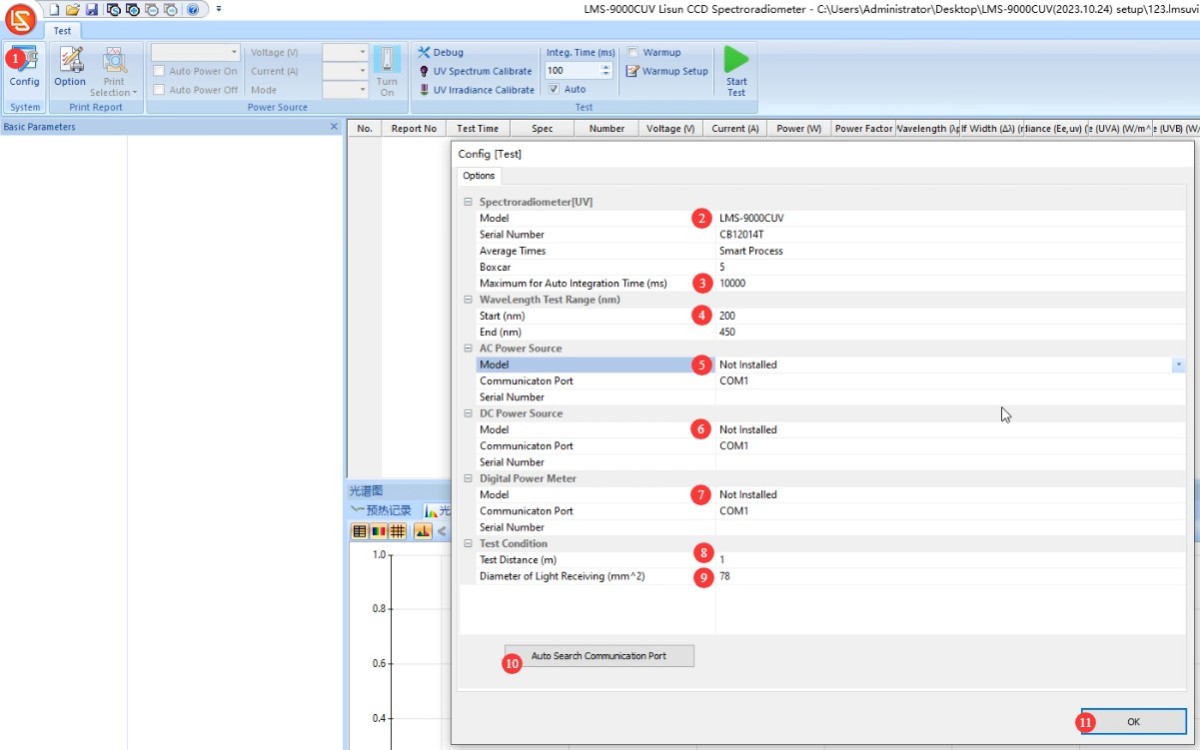
Şekil 4-3
Note 2: Reinstalling the software or unplugging and replugging the USB cable may require re-establishing communication.
5. Kalibrasyon
5.1 Kalibrasyon Prensipleri
| Durumun Tanımı | Yeniden kalibrasyon gerekli mi? |
| İlk kullanım | Kullanımdan önce kalibrasyon yapılması gerekmektedir. |
| The equipment is used frequently | It is recommended to calibrate at least once a month. |
| Equipment that has not been used for more than a month | Bir sonraki kullanımdan önce kalibrasyon yapılması gerekmektedir. |
| Yazılımı yeniden yükleyin | Yeniden kalibrasyon gerekmez |
| Bilgisayarı değiştirin | Yeniden kalibre edilmesi gerekiyor. |
| USB kablosunu takıp çıkarmak | Yeniden kalibrasyon gerekmez |
| Inserting and Removing the Optical Fiber at the End of a Spectroradiometer | |
| Inserting and Removing the Optical Fiber Probe from the Dark Box | Kalibrasyonun yeniden yapılması önerilir. |
| Çevresel koşullarda, örneğin sıcaklık ve nemde önemli değişiklikler. |
5.2 Kalibrasyon Prosedürü
5.2.1 Installation and Illumination of The Standard Light Source
See Figure 5-1 for the power connection for the SLS-UV-P ultraviolet Standard Light Source.
| Numara | not |
| ① | Connect the input power supply. Please follow the prompts to connect the SLS-UV-P to a suitable power source. |
| ② | Connect the output power cord to the test chamber. |
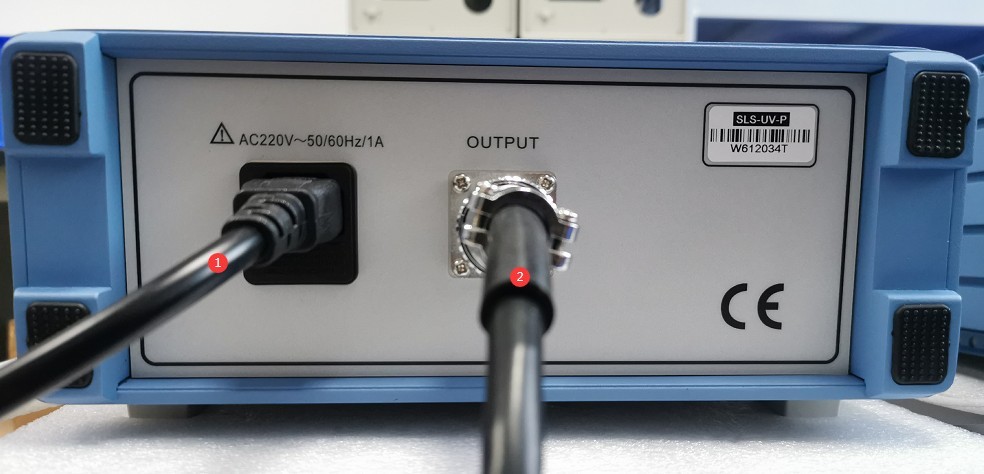
Şekil 5-1
Use the connecting rod to mount the SLS-UV ultraviolet Standard Light Source to the dark box, and connect the power cord of the ultraviolet Standard Light Source inside the dark box to the Standard Light Source, as shown in Figure 5-2.
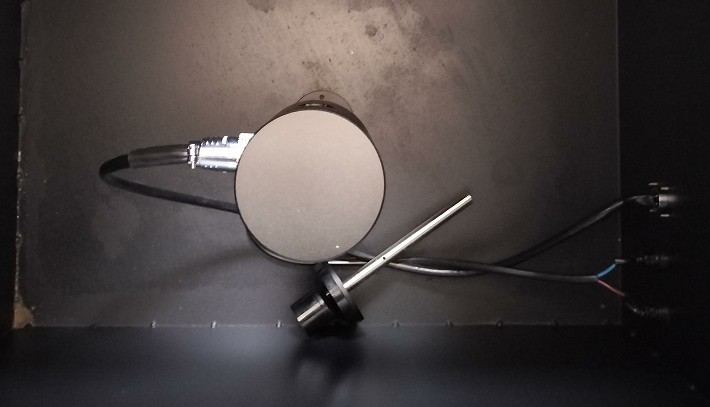
Şekil 5-2
Aç SLS-UV-P and activate the UV Standard Light Source.
Adjust the orientation of the Standard Light Source’s light-emitting aperture so that it is directly aligned with the aperture in the aperture diaphragm and the Optical Fiber on the opposite side of the dark box. Then close the dark box cover, as shown in Figure 5-3.
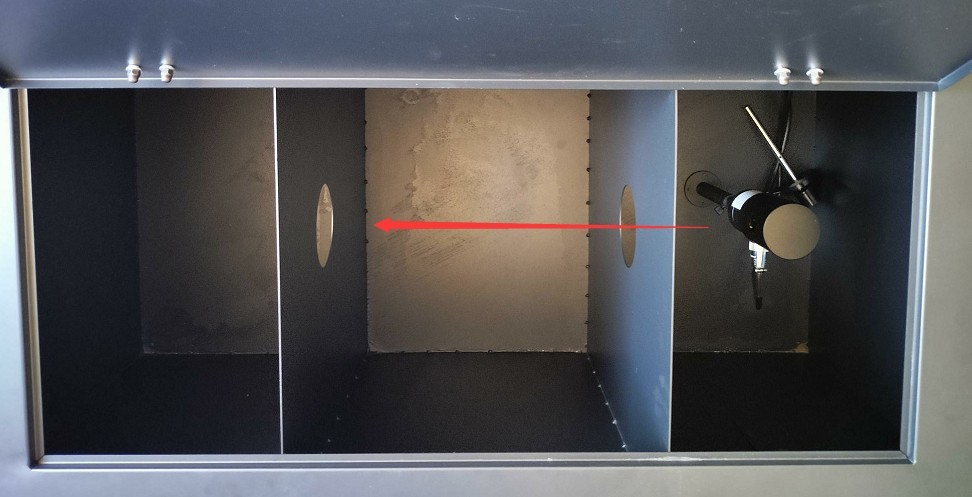
Şekil 5-3
5.2.2 Calibration via the Software Interface
Şekil 5-4'ye bakın.
| Numara | not |
| ① | Click “UV Spectrum Calibrate” |
| ② | Our calibration documents use W/m²/nm; please select the correct unit. |
| ③ | Retrieve the calibration file with the .slf extension mentioned in Section 4.1.2 |
| ④ | When earning points, be sure to check “Automatic”/”Auto” |
| ⑤ | Average count—no need to change it; just use the default value. |
| ⑥ | Stabilization time for Standard Light Sources: UV Standard Light Sources require at least 10 minutes to stabilize; a stabilization period of 10 to 15 minutes is recommended. Calibration can only be performed after the Standard Light Source has stabilized. |
| ⑦ | After confirming that the settings are correct, click Start. |
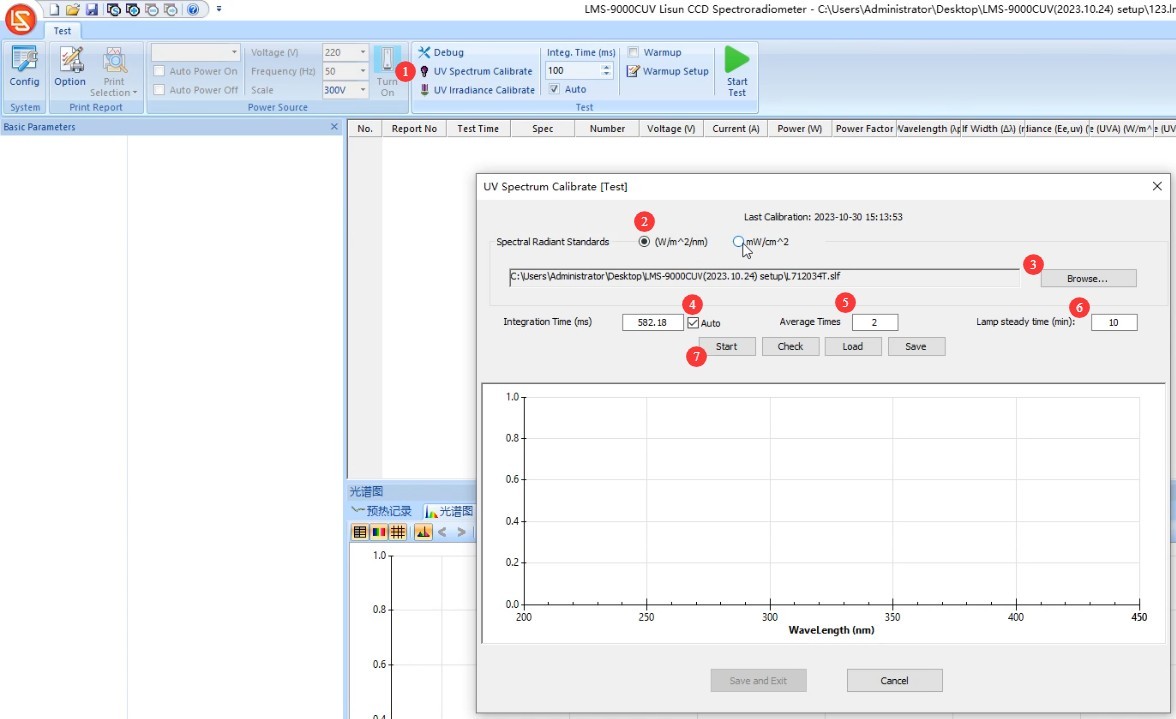
Şekil 5-4
When the countdown ends, the software automatically performs calibration, as shown in Figure 5-5.
| Numara | not |
| ① | Kalibrasyon Tamamlandı |
| ② | Relative Spectral Curves of Ultraviolet Standard Light Sources |
| ③ | Click “Save and Exit” |
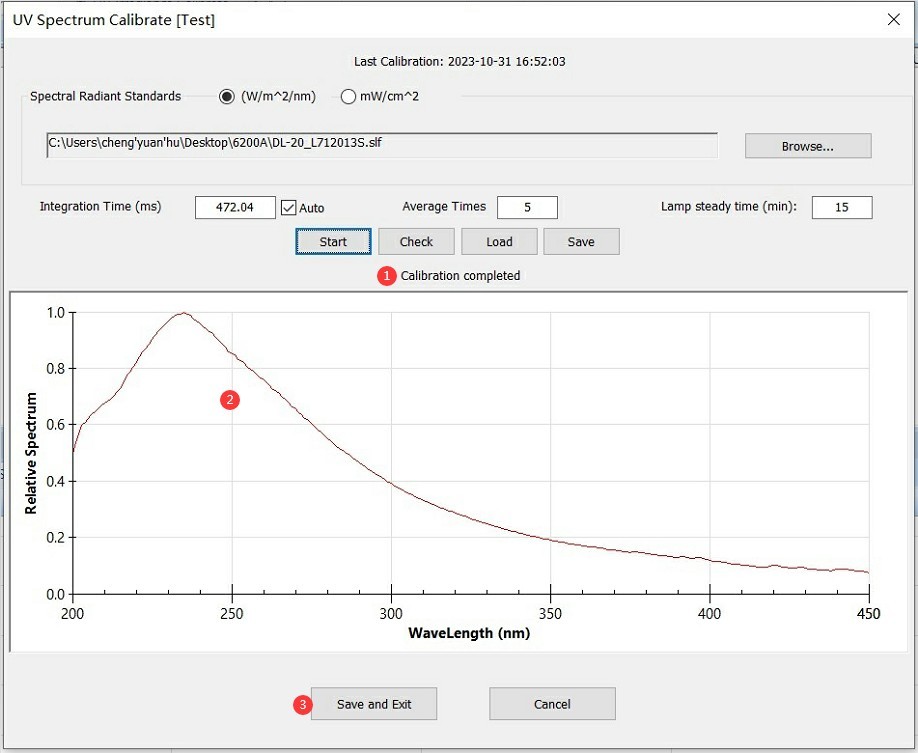
Şekil 5-5
5.2.3 Removal of The Standard Light Source
Turn off the dedicated power supply for the SLS-UV-P ultraviolet Standard Light Source, disconnect the Standard Light Source cable, wait for the Standard Light Source to cool down, then remove the Standard Light Source and its connecting rod and store them properly.
6. Test yapmak
6.1 Installing and Powering On the Sample Light Fixture
6.1.1 Örnek Aydınlatma Armatürlerinin Montajı
We offer models with E27 sockets, as shown in Figure 6-1.
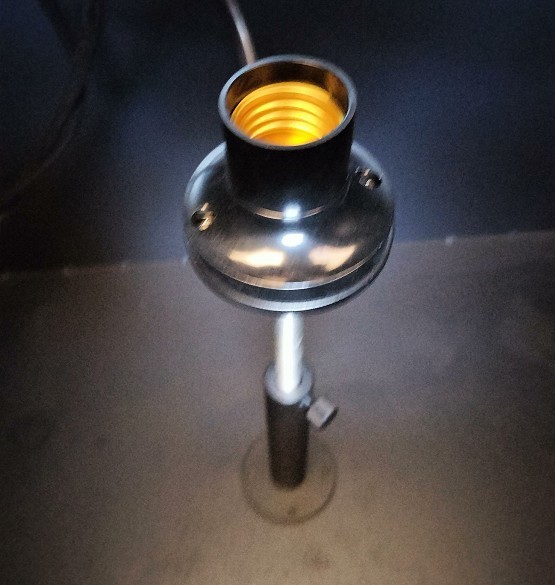
Şekil 6-1
When testing linear luminaires, refer to Section 3.2.2 for installation instructions. For other types of luminaires, secure the light-emitting surface of the luminaire at the standard test position 1 meter from the Optical Fiber, with the light-emitting surface facing the aperture of the light shield and the Optical Fiber. If you need to adjust the actual test distance, refer to Section 4.2.3 to enter the correct test distance into the software.
6.1.2 Turning On the Test Luminaire
Refer to Section 3.2.2, connect the sample luminaire to a suitable power source, turn it on, and then close the test chamber lid.
Not: Eğer bir LISUN power supply, you can use the LMS-9000C software to control the power supply output (Figure 6-2). If you are using your own power supply, please control it manually and turn on the sample lamp.
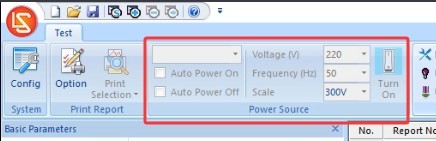
Şekil 6-2
6.2 Yazılım İşletimi
6.2.1 Setting the Units of Irradiance
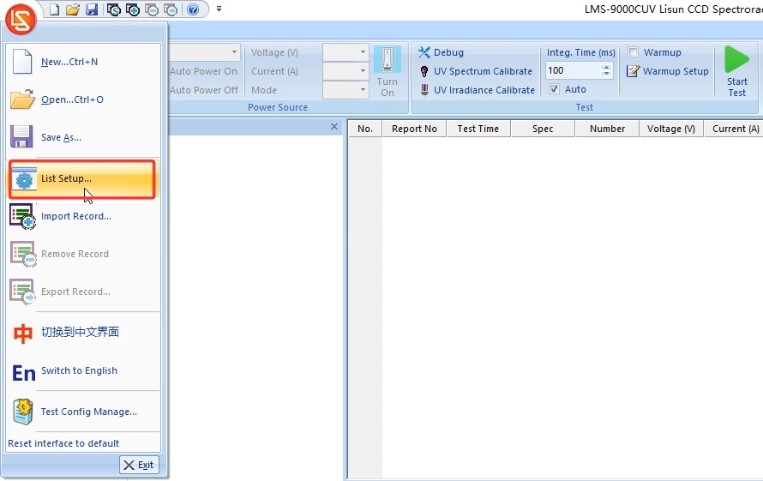
Kırmızı tıklayın LISUN logo in the upper-left corner of the software interface, then click the “List Setup” drop-down menu, as shown in Figure 6-3.
Şekil 6-3
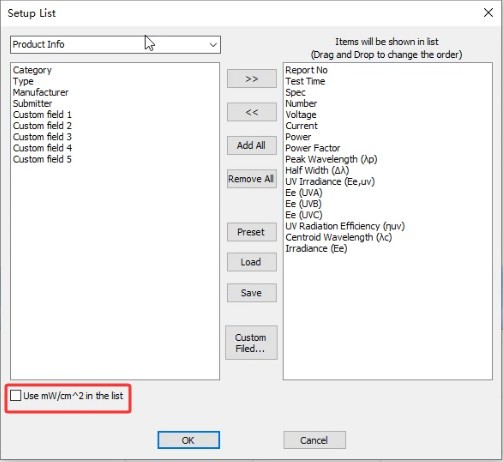
The default unit for irradiance is W/m². Check the option shown in the figure below to change the unit to mW/cm², as shown in Figure 6-4.
Şekil 6-4
6.2.2 Ön Isıtma Parametre Ayarları
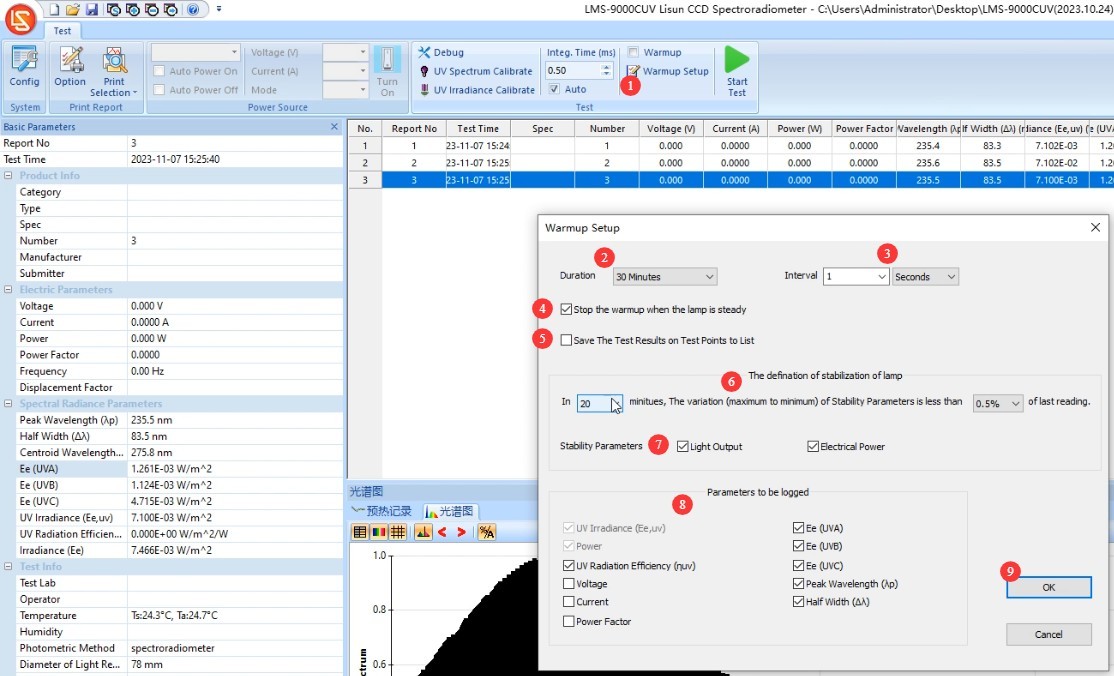
Şekil 6-5'ye bakın.
| Numara | not |
| ① | “Ön Isıtma Parametre Ayarları”na tıklayın. |
| ② | Isınma Süresi Ayarı: Isınmanın amacı, ışık armatürünün ışık ve renk parametreleri stabilize olana kadar belirli bir süre açık kalmasını sağlamaktır; ardından test otomatik olarak devam eder. |
| ③ | Sampling interval: The software automatically takes samples at the set interval throughout the entire warm-up period to obtain real-time data. We recommend setting the interval to 5 seconds or longer. |
| ④ | If this box is checked, the test will begin automatically once the light fixture reaches a stable state, skipping the remaining warm-up time; if this box is not checked, the test will begin only after the warm-up period has elapsed as set. |
| ⑤ | If this box is checked, test reports for all sampling points will be saved automatically; if it is unchecked, only the final test report will be saved automatically. |
| ⑥ | Bir aydınlatma armatürünün kararlı durumunun tanımı. Değerler 20 ve %0.5 olarak ayarlanmışsa, armatürün kararlı durumda olduğu, parametrenin son 20 dakika içinde %0.5'ten fazla değişmemesi durumunda kabul edilir. |
| ⑦ | Yazılımın bir aydınlatma armatürünün stabil olup olmadığını belirlemek için hangi parametreleri kullanacağını seçebilirsiniz: optik parametreler, elektriksel parametreler. |
| ⑧ | Yazılım, ısınma süresi boyunca seçilen parametreler için değişim eğrilerini test raporuna kaydedecektir. |
| ⑨ | Once you’ve finished configuring the settings, click OK to confirm and exit. |
Şekil 6-5
6.2.3 Confirm the test control parameters and conduct the test
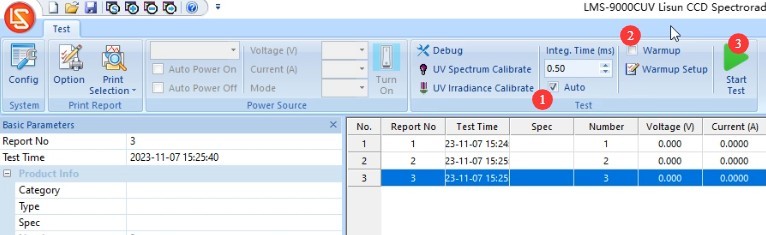
Şekil 6-6'ye bakın.
| Numara | not |
| ① | Be sure to select “Automatic” for “Points Time,” otherwise the test results will be inaccurate. |
| ② | Ön ısıtma gerekiyorsa kutuyu işaretleyin; gerekmiyorsa işaretlemeyin. |
| ③ | Testi çalıştırmak için tıklayın. "Isınma" seçeneği işaretliyse, yazılım bir ısınma geri sayımı başlatacak ve sağ üst köşede mevcut ısınma ilerlemesini ve verilerini gösterecektir; "Isınma" seçeneği işaretli değilse, yazılım testi hemen çalıştıracak ve test sonuçlarını gösterecektir. |
Şekil 6-6
During the warm-up process, the software interface appears as shown in Figures 6 and 7.
| Numara | not |
| ① | Bu bölümde ön ısıtma işleminin ilerleyişi, mevcut ön ısıtma parametreleri ve eğrisi gösterilmektedir. |
| ② | Isınma bölümünü atlayıp doğrudan teste geçmek için tıklayın. |

Şekiller 6–7
After the test is complete, turn off the power to the test lamp and remove it. Do not store lamps in the test chamber when not in use.
6.3 Test File Processing
Şekil 6-8'e bakınız.
| Numara | not |
| ① | After the test is complete, all test reports will be automatically saved in the current database file. |
| ② | Veritabanı dosyasından bir test raporunu silmek için, raporu seçin ve "Sil"e tıklayın. |
| ③ | Test raporlarını bulmayı kolaylaştırmak için, aşağıdaki resimde gösterilen boş düğmeye tıklayarak yeni bir veritabanı dosyası oluşturun ve farklı aydınlatma armatürlerine ait raporları ayrı veritabanı dosyalarında saklayın. Yeni bir veritabanı dosyası oluşturduktan sonra, sistemi yeniden kalibre etmenize veya yeniden yapılandırmanıza gerek kalmadan doğrudan test işlemine devam edebilirsiniz. |
| ④ | Daha önce kaydedilmiş bir veritabanı dosyasını açmak için "Aç" düğmesine tıklayın. |
| ⑤ | Electrical Parameters: If you have purchased a LISUN power meter and successfully established communication as described in Section 4.2.3, the LMS-9000CUV will automatically retrieve the electrical parameters from the power meter; otherwise, you can enter the electrical parameters manually. |
| ⑥ | Click to set print options |
| ⑦ | Click to print the test report. The software automatically uses the printers installed on your computer, including PDF printers. |
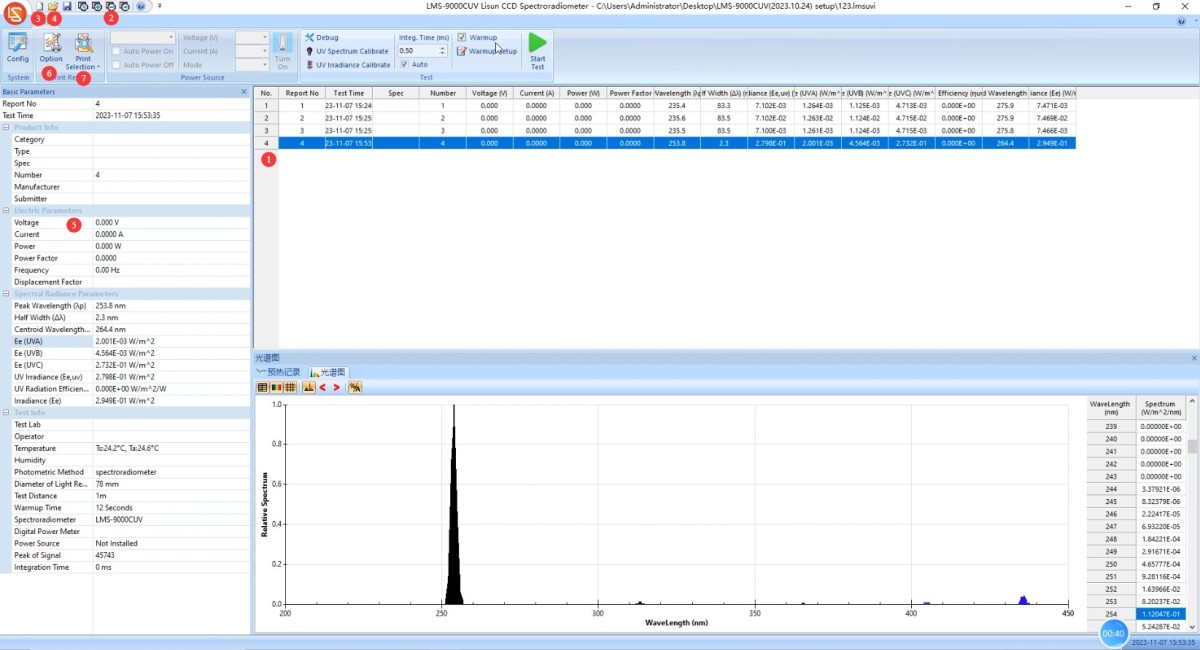
Şekiller 6–8
7. Ekipmanların Günlük Bakımı ve Onarımı
7.1 Routine Hardware Maintenance
Check that all connections are secure and that the USB cables and Optical Fibres are not damaged;
Inspect the packaging of the Standard Light Source to ensure there is no moisture or damage, and verify the expiration date.
7.2 Uzun Vadeli Devre Dışı Bırakma ve Bakım
Thoroughly clean all equipment surfaces and cover all equipment with dust-proof cloths; store USB cables and Optical Fibers separately and securely;
Ensure that the laboratory is dry and well-ventilated to prevent equipment from becoming damp; if the ambient humidity is high, keep a dehumidifier on hand;
Run the system online once a month to ensure it is operating normally.
7.3 Kalibrasyon Aralığı Gereksinimleri
Cihazın ölçüm doğruluğunu ve çalışma güvenilirliğini sağlamak için, periyodik olarak yetkili bir üçüncü taraf metroloji kuruluşuna kalibrasyon için gönderilmesi önerilir. Önerilen kalibrasyon aralığı 12 aydır. Kullanıcılar, kullanım sıklığına, çevresel koşullara ve kalite sistemi gereksinimlerine bağlı olarak belirli kalibrasyon aralığını belirleyebilirler.
8. Sık Karşılaşılan Sorunların Giderilmesi ve Çözülmesi
| Arıza Belirtileri | Olası Nedenler | Prosedür |
| The software won’t open | Not running as an administrator; software installation is incomplete | Right-click the software shortcut and select “Run as administrator”; uninstall the old software, delete any remaining folders, and then reinstall the software. |
| Software Communication Error | Driver not installed or installation failed; USB connection error | See Section 4.1.2 for driver installation; try a different USB port. |
| “Signal too weak” message appears during calibration or testing | “Auto” is not checked for the accumulation time, and the maximum automatic accumulation time is set too short | Refer to sections 5.2.2 and 6.2.3; be sure to select “Auto” for the integration time during calibration or testing. Refer to section 4.2.3 to set a longer maximum automatic integration time. If the signal is still too weak, the Optical Fiber may be damaged. |
| The electrical parameter is displayed as 0 | You have not purchased a LISUN power meter, or there is a communication error. | See Section 6.3 for automatically retrieving electrical parameters or manually entering them. |
| Software Encountered an Error Opening the Database File | The database file path does not exist, or the file is in use | See Section 6.3 for instructions on creating a new database file; do not store database files directly on your computer’s desktop. |